NAT Configuration – Lab Exercise
NAT Configuration – Lab Exercise
Pada lab ini, anda akan mengkonfigurasi Network Address Translation static dan dynamic, serta Port Address Translation. Router, server dan PC sudah dikonfigurasi masing-masing dengan pengaturan network addressing. R1 adalah router edge WAN di perusahaan anda, yang secara default route ke router Service Provider
Kronologinya, Anda sudah membeli range alamat IP public 203.0.113.0/28. 203.0.113.1 sudah dipasangkan ke default gateway Service Provider SP1, 203.0.113.2 sudah dipasangkan ke router anda R1 pada interface f0/0 yang mengarah ke internet. Sedangkan 203.0.113.3 – 203.0.113.14 adalah sisa alamat IP public yang tersedia
Ingat bahwa entri tabel age NAT Translation akan habis dengan cepat. Kirim traffic lagi apabila anda tidak melihat hasil yang diekspektasikan pada tabel.
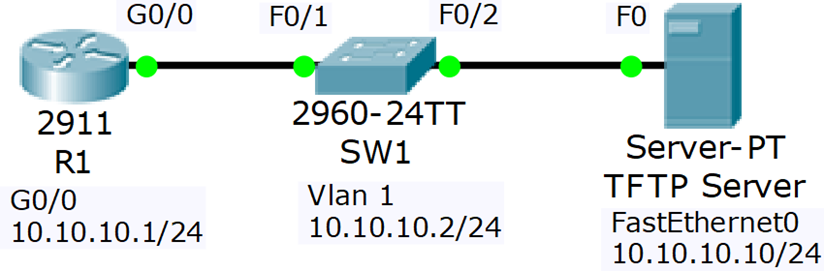
Lab Topology

Static NAT
1) Int-S1 is your company’s web server. It must be reachable from external customers browsing the Internet. Configure NAT on R1 so that external customers can reach the server using the public IP address 203.0.113.3. Do not change any IP addressing or routing information.
Int-S1 membutuhkan IP public tetap, maka kita diharuskan mengkonfigurasi NAT static.
Konfigurasikan interface f0/0 yang mengarah ke Internet sebagai interface NAT outside
R1(config)#int f0/0
R1(config-if)#ip nat outside
Konfigurasikan interface f0/1 yang mengarah ke Int-S1 sebagai interface NAT inside
R1(config)#int f0/1
R1(config-if)#ip nat inside
Konfigurasikan rule mapping NAT static local address inside 10.0.1.10 ke alamat IP global 203.0.113.3
R1(config)#ip nat inside source static 10.0.1.10 203.0.113.3
2) Ping Ext-S1 from Int-S1 to check the NAT rule is working and you have connectivity.

3) On Ext-S1, click on ‘Desktop’ then open ‘Web Browser’. Open the NAT’d public IP address of Int-S1 at https://203.0.113.3 in the browser to verify that external customers on the Internet can reach your web server.
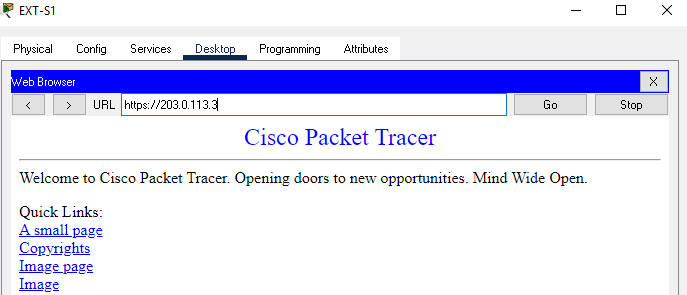
Server Ext-S1 sudah dapat mengakses Server Int-S1 dengan menggunakan web browser dengan https://203.0.113.3.
4) Verify the connection appears in the NAT translation table. Note that entries age out quickly so generate the traffic again if you did not check the table quickly enough.
R1#sh ip nat translations
Pro Inside global Inside local Outside local Outside global
icmp 203.0.113.3:16 10.0.1.10:16 203.0.113.20:16 203.0.113.20:16
--- 203.0.113.3 10.0.1.10 --- ---
tcp 203.0.113.3:443 10.0.1.10:443 203.0.113.20:1025 203.0.113.20:1025
Notes:
Pro : Protocol yang digunakan untuk proses NAT
Inside global : Address public yang disiapkan untuk diterjemahkan dari Inside local
Inside local : Address private yang akan diterjemahkan ke Address public
Outside local : Address tujuan
Outside global : Address tujuan
Saat kita mencoba akses dari Ext-S1 ke Int-S1 menggunakan web browser, maka dapat dilihat pada command sh ip nat translation pada entri tcp NAT bekerja untuk menerjemahkan IP private ke IP public dari 10.0.1.10 ke 203.0.113.20.
Dynamic NAT
5) Configure NAT on R1 so that PCs in the 10.0.2.0/24 subnet have connectivity to external networks on a first come first served basis. Assign global addresses from the range 203.0.113.4 to 203.0.113.12. Do not enable Port Address Translation.
Sebelumnya interface f0/0 yang mengarah ke Internet sudah dikonfigurasi sebagai NAT outside.
R1(config)#int f0/0
R1(config-if)#ip nat outside
Konfigurasikan interface f1/0 yang mengarah ke PC sebagai interface NAT inside
R1(config)#int f1/0
R1(config-if)#ip nat inside
Konfigurasikan pool address global
R1(config)#ip nat pool Flackbox 203.0.113.4 203.0.113.12 netmask 255.255.255.240
Notes:
Dengan Dynamic NAT, kita bisa mentranslate alamat IP private ke alamat IP public secara dinamis. Alamat IP private dan alamat IP public bisa didaftarkan lebih dari 1 dengan range tertentu. Alamat IP Private diterjemahkan ke alamat IP public secara berurutan sesuai dengan range IP yang tersedia sampai dengan batas waktu tertentu. Apabila IP public tersebut habis, maka user harus menunggu sampai IP public sudah tersedia kembali untuk digunakan.
Di sini kita buat pool range untuk IP public dengan range 203.0.113.4 – 203.0.113.12.
Buat access list dengan mereferensikan IP address internal yang akan ditranslate
R1(config)#access-list 1 permit 10.0.2.0 0.0.0.255
Notes:
Dengan access-list kita bisa membuat kriteria IP address private mana saja yang akan ditranslate dengan NAT dynamic. Setelah ini access-list akan diintegrasikan dengan command NAT.
Integrasikan access list dengan NAT pool untuk menyelesaikan konfigurasi
R1(config)#ip nat inside source list 1 pool Flackbox
Notes:
Disini yang akan menjadi IP privatenya adalah source list 1 yang diambil dari access-list 1 yang sebelumnya sudah dibuat. Dan IP publicnya adalah pool Flackbox yaitu dengan range 203.0.113.4 – 203.0.113.12
6) Turn on NAT debugging on R1. Ping Ext-S1 from PC1. View the debug output on R1. You should see NAT entries for the 5 pings. Which global address was PC1 translated to?
PC akan di-translate ke alamat pertama yang tersedia pada pool, yaitu 203.0.113.4.
R1#debug ip nat
IP NAT debugging is on

R1#
*Mar 01, 04:40:30.4040: NAT: s=10.0.2.10->203.0.113.4, d=203.0.113.20 [1]
R1#
*Mar 01, 04:40:36.4040: NAT: s=10.0.2.10->203.0.113.4, d=203.0.113.20 [2]
*Mar 01, 04:40:36.4040: NAT*: s=203.0.113.20, d=203.0.113.4->10.0.2.10 [17]
R1#
*Mar 01, 04:40:37.4040: NAT: s=10.0.2.10->203.0.113.4, d=203.0.113.20 [3]
*Mar 01, 04:40:37.4040: NAT*: s=203.0.113.20, d=203.0.113.4->10.0.2.10 [18]
R1#
*Mar 01, 04:40:38.4040: NAT: s=10.0.2.10->203.0.113.4, d=203.0.113.20 [4]
*Mar 01, 04:40:38.4040: NAT*: s=203.0.113.20, d=203.0.113.4->10.0.2.10 [19]
R1#
*Mar 01, 04:41:30.4141: NAT: expiring 203.0.113.4 (10.0.2.10) icmp 1 (1)
R1#
*Mar 01, 04:41:36.4141: NAT: expiring 203.0.113.4 (10.0.2.10) icmp 2 (2)
R1#
*Mar 01, 04:41:37.4141: NAT: expiring 203.0.113.4 (10.0.2.10) icmp 3 (3)
R1#
*Mar 01, 04:41:38.4141: NAT: expiring 203.0.113.4 (10.0.2.10) icmp 4 (4)
7) Verify the ping connection appears in the NAT translation table.
R1#show ip nat translations
Pro Inside global Inside local Outside local Outside global
icmp 203.0.113.4:5 10.0.2.10:5 203.0.113.20:5 203.0.113.20:5
icmp 203.0.113.4:6 10.0.2.10:6 203.0.113.20:6 203.0.113.20:6
icmp 203.0.113.4:7 10.0.2.10:7 203.0.113.20:7 203.0.113.20:7
icmp 203.0.113.4:8 10.0.2.10:8 203.0.113.20:8 203.0.113.20:8
--- 203.0.113.3 10.0.1.10 --- ---
tcp 203.0.113.3:443 10.0.1.10:443 203.0.113.20:1025 203.0.113.20:1025
8) When all the addresses in the pool 203.0.113.4 to 203.0.113.12 have been allocated, what will happen when the next PC tries to send traffic to an external host?
Yang akan terjadi adalah IP private tidak akan dapat diterjemahkan ke IP address global karena alamatnya sudah habis. Akibatnya traffic akan tidak akan berjalan. User harus mencoba lagi menunggu hingga waktu translation habis. Lalu address global akan dikembalikan ke pool dan siap untuk digunakan.
9) Enable Port Address Translation so that the last IP address in the range can be reused when all IP addresses have been allocated to clients.
R1#clear ip nat translation *
R1#conf t
R1(config)#ip nat inside source list 1 pool Flackbox overload
Notes:
Dengan menambahkan command overload, berarti IP global tersebut akan memanfaatkan port dari IP private. Artinya 1 IP global dapat digunakan berkali-kali dengan membedakan Port dari IP private yang ditranslate.
10) Cleanup: Completely remove the access list and all NAT configuration from R1. Use the commands ‘show run | section nat’ and ‘show access- list’ to verify all configuration is removed.
R1#show run | section nat
R1#show access-lists
Port Address Translation PAT
11) Your company no longer has a range of public IP addresses. Instead you will receive a single public IP address via DHCP from your service provider.
Shutdown interface F0/0 on R1 and remove its IP address. Reconfigure it to receive its IP address via DHCP from the service provider router SP1.
R1(config)#int f0/0
R1(config-if)#shutdown
R1(config-if)#no ip address
R1(config-if)#ip address dhcp
12) Bring the interface back up and wait for DHCP. What IP address is it assigned?
R1(config)#int f0/0
R1(config-if)#no shutdown
R1(config-if)#
*Mar 01, 00:07:22.077: %DHCP-6-ADDRESS_ASSIGN: Interface FastEthernet0/0 assigned DHCP address 203.0.113.13, mask 255.255.255.240, hostname R1
R1#show ip interface brief
Interface IP-Address OK? Method Status Protocol
FastEthernet0/0 203.0.113.13 YES DHCP up up
FastEthernet0/1 10.0.1.1 YES manual up up
FastEthernet1/0 10.0.2.1 YES manual up up
FastEthernet1/1 unassigned YES manual administratively down down
Vlan1 unassigned YES unset administratively down down
Notes:
R1 interface F0/0 sudah mendapatkan IP 203.0.113.13 dari SP1
13) Configure NAT on R1 so that PCs in the 10.0.2.0/24 subnet have connectivity to external networks on a first come first served basis. Allow multiple PCs to reuse the IP address on interface F0/0 on R1. Ensure that NAT continues to work if the DHCP address assigned by the provider changes.
Konfigurasikan interface f1/0 yang mengarah ke PC sebagai NAT inside
R1(config)#int f1/0
R1(config-if)#ip nat inside
Konfigurasikan interface f0/0 yang mengarah ke Ext-S1 sebagai NAT outside
R1(config)#int f0/0
R1(config-if)#ip nat outside
Buat access list sebagai referensi IP address internal yang akan di-translate
R1(config)#access-list 1 permit 10.0.2.0 0.0.0.255
Integrasikan access list yang sudah dibuat dengan interface NAT outside untuk mengaktifkan PAT (Port Address Translation)
R1(config)#ip nat inside source list 1 interface f0/0 overload
14) Ensure NAT debugging on R1 is still enabled. On PC1, click on ‘Desktop’ then open ‘Web Browser’. Open the public IP address of Ext-S1 at https://203.0.113.20 in the browser to verify that PAT is working and you can reach external servers.

15) View the debug output on R1. Which global IP address was PC1 translated to?
Dapat dilihat pada debug bahwa PC1 dengan IP 10.0.2.10 ditranslate menjadi 203.0.113.13
R1#
*Mar 01, 02:14:26.1414: NAT*: s=203.0.113.20, d=203.0.113.13->10.0.2.10 [63]
*Mar 01, 02:14:26.1414: NAT*: s=10.0.2.10->203.0.113.13, d=203.0.113.20 [82]
*Mar 01, 02:14:26.1414: NAT*: s=203.0.113.20, d=203.0.113.13->10.0.2.10 [64]
*Mar 01, 02:14:26.1414: NAT*: s=10.0.2.10->203.0.113.13, d=203.0.113.20 [83]
16) On PC2, click on ‘Desktop’ then open ‘Web Browser’. Open the public IP address of Ext-S1 at http://203.0.113.20 in the browser. Which global IP address is PC2 translated to?

R1#
*Mar 01, 02:19:47.1919: NAT*: s=203.0.113.20, d=203.0.113.13->10.0.2.11 [67]
*Mar 01, 02:19:47.1919: NAT*: s=10.0.2.11->203.0.113.13, d=203.0.113.20 [5]
17) Verify the connections in the NAT translation table.
R1#show ip nat translations
Pro Inside global Inside local Outside local Outside global
tcp 203.0.113.13:1025 10.0.2.11:1025 203.0.113.20:443 203.0.113.20:443
tcp 203.0.113.13:1027 10.0.2.10:1027 203.0.113.20:443 203.0.113.20:443
Notes:
Terlihat bahwa terdapat alamat IP inside local-nya berbeda tetapi alamat IP inside global-nya sama. Hal ini membuktikan bahwa 1 alamat IP inside global dapat digunakan untuk beberapa IP inside local dalam waktu yang sama.
Perbedaan IP inside global dari keduanya adalah pada bagian port. Port outside global ditentukan dari Port yang berada pada inside local. Hal ini dibuktikan di mana angka pada port inside local sama dengan port inside global
18) Show the NAT statistics on R1.
R1#show ip nat statistics
Total translations: 2 (0 static, 2 dynamic, 2 extended)
Outside Interfaces: FastEthernet0/0
Inside Interfaces: FastEthernet1/0
Hits: 22 Misses: 82
Expired translations: 8
Dynamic mappings:

Comments
Post a Comment