Configurating ACL
28-1 ACL Configuration – Lab Exercise
Scenario ini saya ambil dari sebuah buku Cisco CCNA Lab Guide 200 – 301 yang disusun oleh Neil Anderson. “Neil is an excellent instructor and course developer and has the ability to pick up almost any subject no matter how complex. He has taught all over the world and always gets superb evaluations. I would recommend Neil without hesitation”, – Dan Pegler, Cisco.
Buku ini dapat diakses melalui www.flackbox.com secara gratis.
Berikut adalah scenarionya:
In this lab you will configure standard and extended Access Control Lists.
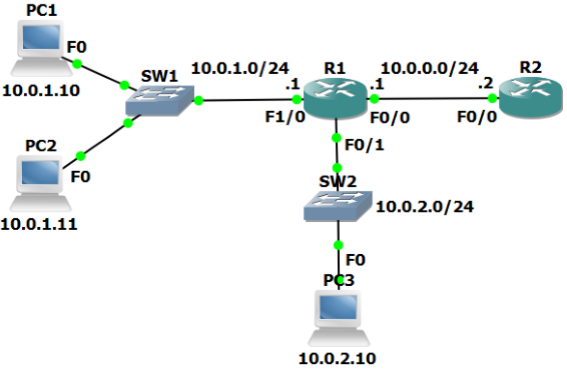
The routers and PCs have been configured with their network addressing settings, and R2 has a static route for the internal 10.0.1.0/24 and 10.0.2.0/24 networks.
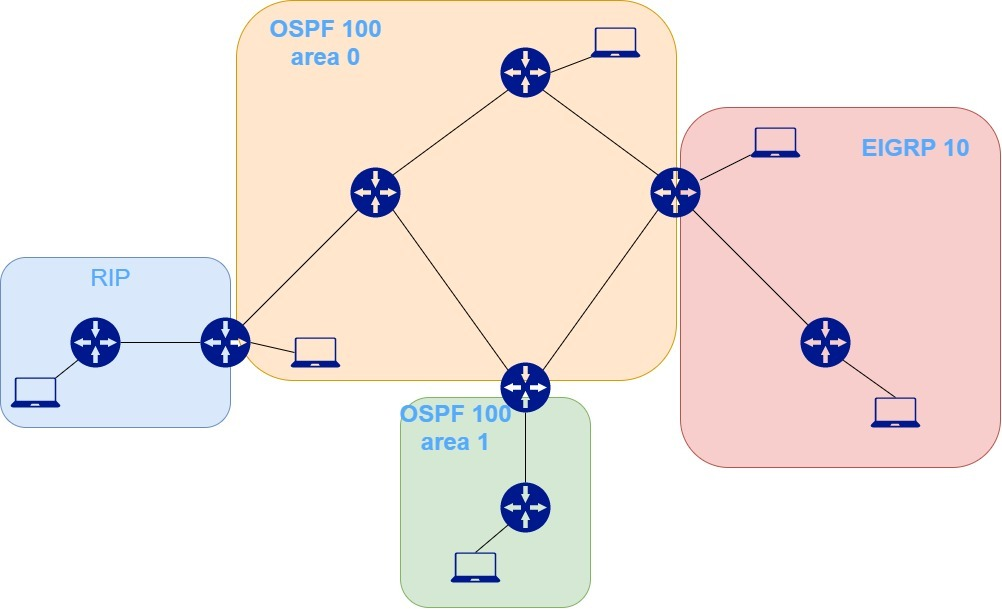
Lab Topology
Numbered Standard ACL
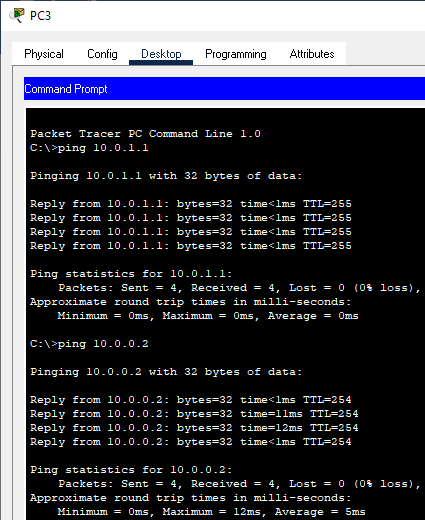
1) Verify that all PCs have connectivity to each other, to R1 and to R2.
Answer:
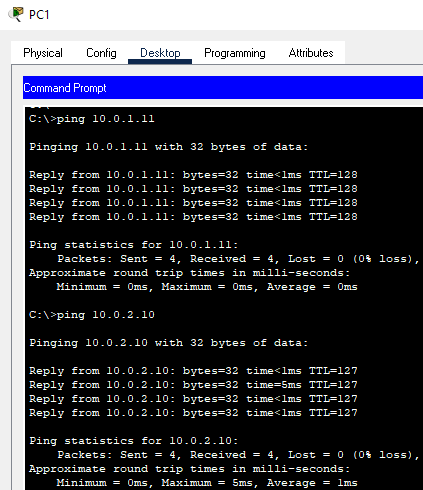
PC1 to R1, R2

PC2 to R1, R2

PC3 to R1, R2
2) Configure and apply a numbered standard ACL on R1 which denies traffic from all hosts in the 10.0.2.0/24 subnet to R2.
The PCs in the 10.0.1.0/24 and 10.0.2.0/24 subnets must maintain connectivity to each other.
The PCs in the 10.0.1.0/24 subnet must maintain connectivity to R2.
Answer:
R2(config)#access-list 1 deny 10.0.2.0 0.0.0.255
R2(config)#access-list 1 permit any
R2(config)#int fa0/0
R2(config-if)#ip access-group 1 in
R2(config-if)#exit
R2(config)#exit
R2#sh ip access-lists
Standard IP access list 1
10 deny 10.0.2.0 0.0.0.255 (4 match(es))
20 permit any
R2#
Note:
ACL dasarnya terdapat 2 metode, yaitu permit dan deny. Permit berarti mengizinkan traffic, Deny berarti membatalkan traffic.
Di sini, kita diminta untuk mengkonfigurasi dan mengaplikasikan numbered standard ACL di mana kita harus membatalkan traffic dari semua host di subnet 10.0.2.0/24 menuju R2.
Maka dari itu kita input command access-list 1 deny 10.0.2.0 0.0.0.255, detailnya:
Access-list : Add an access list entry
1 : IP standard access list
Deny : Specify packets to reject
10.0.2.0 : Address to match
0.0.0.25 : Wildcard bits
Kemudian, kita input command access-list 1 permit any dengan tujuan apabila terdapat paket yang tidak sesuai dengan kondisi sebelumnya, maka paket tersebut diizinkan untuk dilewatkan. Apabila kita tidak menginput command tersebut maka semua traffic tidak akan diizinkan untuk dilewatkan. Karena pada dasarnya apabila kita mengaplikasikan access-list nya saja, ACL tersebut langsung bekerja untuk membatalkan semua traffic yang masuk atau keluar dari router tersebut.
Selanjutnya, kita aplikasikan access-list 1 pada interface fa0/0 bagian inbound dengan cara menginput subcommand interface ip access-group 1 in.
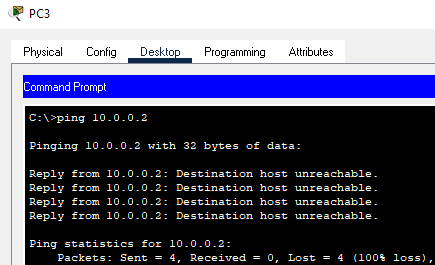
3) Test that traffic is secured exactly as required.
Verify PC1 and PC2 can ping R2. PC3 cannot ping R2.
PC3 can ping PC1 and PC2.
Answer:
PC1 to R2

PC2 to R2

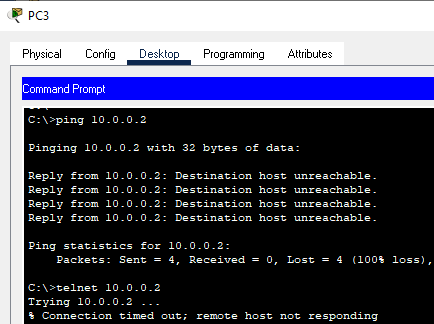
PC3 to R2
PC3 to PC1, PC2

Numbered Extended ACL
4) Configure and apply a numbered extended ACL on R1 which permits Telnet access from PC1 to R2. Telnet to R2 must be denied for all other PCs in the network.
All other connectivity must be maintained. Do not change the existing ACL.
Telnet access has already been enabled on R2. The password is ‘Flackbox’
Answer:
R1(config)#access-list 101 permit tcp host 10.0.1.10 host 10.0.0.2 eq telnet
R1(config)#access-list 101 deny tcp any host 10.0.0.2 eq telnet
R1(config)#access-list 101 permit ip any any
R1(config)#int fa1/0
R1(config-if)#ip access-group 101 in
R1(config-if)#exit
R1(config)#exit
R1#sh access-lists
Extended IP access list 101
10 permit tcp host 10.0.1.10 host 10.0.0.2 eq telnet
20 deny tcp any host 10.0.0.2 eq telnet
30 permit ip any any
Note:
Sedikit berbeda dengan access-list standard, access-list extended terdapat tambahan kompleksitas. Tidak hanya membatasi dari IP address, versi extended kita bisa membatasinya berdasarkan jenis paket yang dikirimkan.
Di sini kita diminta untuk mengizinkan access Telnet dari PC1 ke R2 dengan mengaplikasikan ACL pada R1.
Maka kita input command access-list 101 permit tcp host 10.0.1.10 host 10.0.0.2 eq telnet, dengan detailnya:
access-list 101 : Add an access list entry (IP extended access list)
permit tcp : Specify packets to forward (Transmission Control Protocol)
host 10.0.1.10 : A single source host (10.0.1.10)
host 10.0.0.2 : A single destination host (10.0.0.2)
eq telnet : Match only packets on a given port number (Telnet (23))
Selanjutnya kita diminta untuk membatalkan upaya telnet ke R2 dari PC lain pada jaringan.
maka kita input command access-list 101 deny tcp any host 10.0.0.2 eq telnet, detailnya sebagai berikut:
access-list 101 : Add an access list entry (IP extended access list)
deny tcp : Specify packets to reject (Transmission Control Protocol)
any : Any source host
host 10.0.0.2 : A single destination host (10.0.0.2)
eq telnet : Match only packets on a given port number (Telnet (23))
Kemudian kita izinkan seluruh traffic agar bisa dilewatkan pada R1 diluar pada kondisi di atas. Caranya kita input command access-list 101 permit ip any any, dengan detail:
access-list 101 : Add an access list entry (IP extended access list)
permit ip : Specify packets to forward (Any Internet Protocol)
any any : Any source host, Any destination host
Sama seperti sebelumnya, disini kita aplikasikan ACL pada interface Fa1/0. Usahakan aplikasikan ACL tersebut paling dekat dari arah sumber sehingga tidak terjadi kesalahan.
5) Test that traffic is secured exactly as required. Use the command ‘telnet 10.0.0.2’ from the PCs to test and the password ‘Flackbox’. Type ‘exit’ to leave the Telnet session.
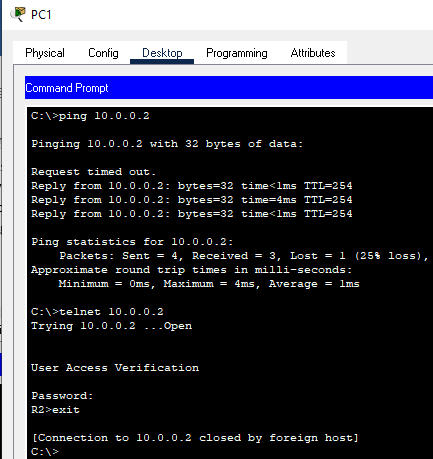
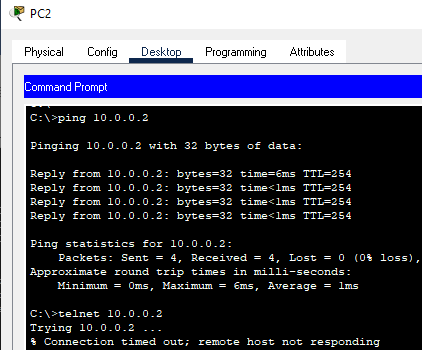
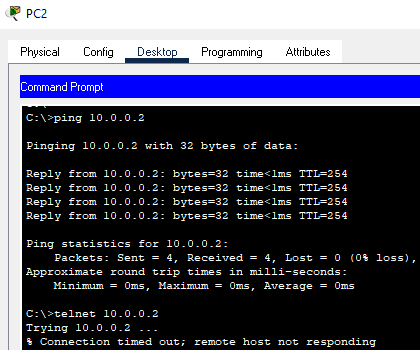
Verify that PC1 can ping and Telnet to R2. PC2 can ping R2 but not Telnet to it.
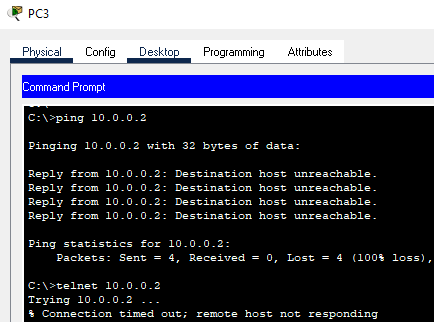
PC3 cannot ping or Telnet to R2. The PCs can all ping each other.
Answer:
PC1 can ping and Telnet to R2
PC2 can ping R2 but not Telnet to it
PC3 cannot ping or Telnet to R2.
PC1 to PC2, PC3

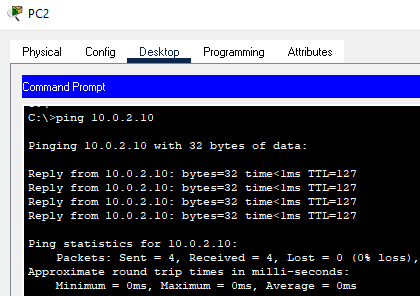
PC2 to PC3
6) How many Telnet packets were permitted by the ACL?
Answer:
Only 1 from PC1 to R2.
Named Extended ACL
7) Remove the numbered extended ACL you just configured from the interface. Do not delete the ACL.
Answer:
R1(config)#int fa1/0
R1(config-if)#no ip access-group 101 in
8) Configure and apply a named extended ACL on R1 as follows:
Permit Telnet from PC1 to R2. Telnet to R2 must be denied for all other PCs in the network.
Permit ping from PC2 to R2. Ping to R2 must be denied for all other PCs in the network.
All other connectivity must be maintained.
Answer:
R1(config)#ip access-list ext telnet_R2
R1(config-ext-nacl)#permit tcp host 10.0.1.10 host 10.0.0.2 eq telnet
R1(config-ext-nacl)#deny tcp any host 10.0.0.2 eq telnet
R1(config-ext-nacl)#permit icmp host 10.0.1.11 host 10.0.0.2 echo
R1(config-ext-nacl)#deny icmp any host 10.0.0.2 echo
R1(config-ext-nacl)#permit ip any any
R1(config-ext-nacl)#exit
R1(config)#int fa1/0
R1(config-if)#ip ac
R1(config-if)#ip access-group telnet_R2 in
R1(config-if)#exit
R1(config)#exit
R1#sh access-lists telnet_R2
Extended IP access list telnet_R2
permit tcp host 10.0.1.10 host 10.0.0.2 eq telnet
deny tcp any host 10.0.0.2 eq telnet
permit icmp host 10.0.1.11 host 10.0.0.2 echo
deny icmp any host 10.0.0.2 echo
permit ip any any
R2#
Note:
Di sini kita diminta untuk membuat ACL extended named. Maka kita buat grup ACL-nya terlebih dahulu dengan menginput command ip access-list ext telnet_R2.
Selanjutnya kita diminta untuk dapat mengizinkan PC1 melakukan Telnet ke R2. Maka dalam subcommand ACL, kita input command permit tcp host 10.0.1.10 host 10.0.0.2 eq telnet.
Kemudian kita harus membuat seluruh Telnet ke R2 dibatalkan dari seluruh PC lain. Maka kita input command deny tcp any host 10.0.0.2 eq telnet.
Selanjutnya kita diminta agar mengizinkan test ping dari PC2 ke R2. Kita input command permit icmp host 10.0.1.11 host 10.0.0.2 echo.
Kemudian kita harus membuat seluruh test ping ke R2 dibatalkan dari seluruh PC lain. Maka kita input command deny icmp any host 10.0.0.2 echo.
Lalu, semua konektivitas harus dipertahankan. Maka kita input command permit ip any any.
9) Test that traffic is secured exactly as required.
Verify that PC1 cannot ping R2 but can Telnet to it. PC2 can ping R2 but cannot Telnet to it.
PC3 cannot ping or Telnet to R2. The PCs can all ping each other.
Answer:
Verify that PC1 cannot ping R2 but can Telnet to it.

PC2 can ping R2 but cannot Telnet to it.
PC3 cannot ping or Telnet to R2
The PCs can all ping each other.
PC1 to PC2 and PC3
PC2 to PC3


Great!!!
ReplyDeleteNgerii suhu
ReplyDeletemasih belajar ini mah hehe
Delete